Flask App in a Docker Container
For Project 2 in my Intro to Cloud Computing course, the goal was to create a customized Docker container which runs a simple python script. For this post I am going to run through my process.
The associated GitHub repo for this project can be found here: https://github.com/canfielder/DSBA-6190_Proj2
The associated DockerHub repo can be found here: https://hub.docker.com/repository/docker/canfielder/dsba-6190_proj2_docker
I also want to give a huge thanks to my professor, Noah Gift, and his co-authors on the book Python for DevOps from O-Reilly. It provided a lot of the background on creating Docker Containers.
Project Outline
The first deviation I made for this project was to expand on the simple python script which would be contained within the Docker container. Instead of a simple “Hello World” script, I decided to develop a simple Flask app which would employ a pickled scikit-learn model. This would give me the chance to work developing a model in a notebook and then exporting for use in another location. It might not surprise most of you that this process was pretty simple, but I had yet to try this, so it was good practice.
So, with that deviation noted, the workflow for this project was as follows:
- Develop and pickle scikit-learn model.
- Create Flask app, using the pickled model.
- Containerize the Flask app in a Docker Container.
- Upload an image of the container to DockerHub.
- Download the image of the container in a new evironment and test
Working Enironments
For the work of developing a model in a notebook, I used Google Colab. For Flask app and docker container development I worked in the AWS Cloud9 space. Finally, to test that the docker image was successfully created and deployed to DockerHub, I deployed the docker image to new environment, in this case Google Cloud Platform.
Step 1 - Develop a Model
Before I developed a model, I needed to identify a problem and an associated dataset. As this project was about created a Docker Container, and not data processing or model accuracy, I decided to pick a pretty simple, clean dataset. I went with the Wine Dataset from the UCI Machine Learning Repository. There’s a good chance you’ve seen it before. It’s not Iris popular, but it’s popular. The dataset can be found here: https://archive.ics.uci.edu/ml/datasets/wine.
I focused only on the Red Wine part of the data. The data contained 12 variables, 11 features with one dependent variable. The dependent variable was wine quality one a 1 - 10 scale. All variables were continuous.
In summary, I ran the data through four different regression models: linear regression, random forest regression, gradient boost regression, and support vector machines regression. The input data was also scaled with a Standard Scalar.
The full analysis can be best seen in the notebook here: https://github.com/canfielder/DSBA-6190_Proj2/blob/master/wine_predict/wine_quality_predict.ipynb
While none of the models performed all that well, random forest regression performed the best. So I exported BOTH the random forest regression model JOBLIB file AND the standard scalar JOBLIB file. You need both files to correctly use the model on our test data.
With the model created and exported, I was ready to create the Flask app.
Step 2 - Flask App
As the class this project is for is a Cloud Computing class, most of the work I do is in cloud environments. This work is no different. So for this step I used Amazon Web Service’s Cloud9 tool. For those who haven’t used it, Cloud9 is a great environment for development, allowing easy access to the terminal and an IDE for visualizing your code. Plus, the default setting is for your instance to hibernate automatically after 30 minutes of no activity. No need to worry about accidentally leaving an instance running and unknowingly running up a bill.
So before I started developing the Flask app I needed to set up the working environment. This isn’t actually specific to this project. Instead it’s some baseline actions I try to take with every project.
Step 2a - Setup
Create and Environment
Since I’m working in AWS Cloud9, I need to create an environment.
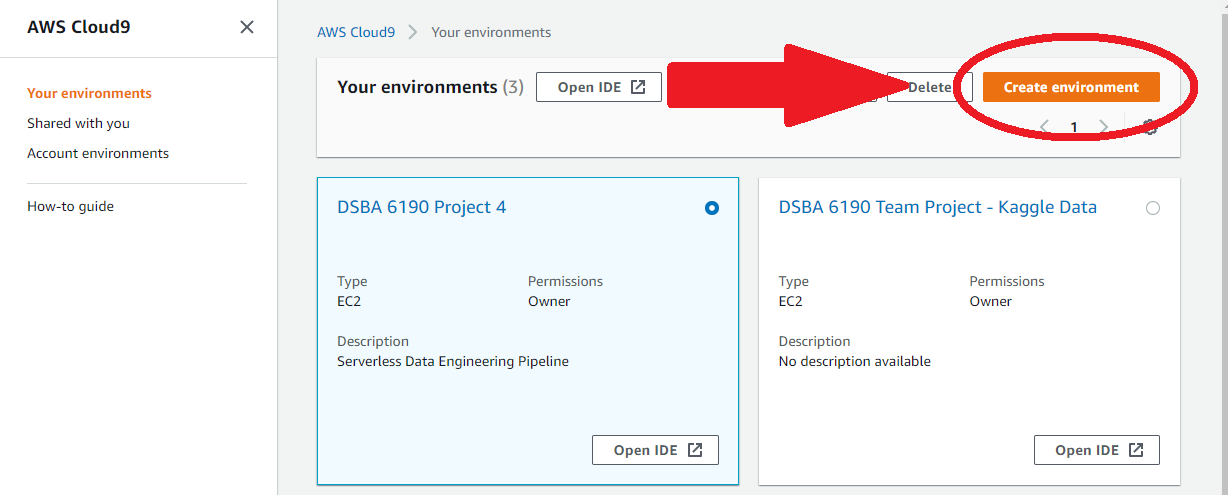
Creating an Environment in Cloud9 essentially means generating an instance. I need to pick that instances size. This project should require too much memory, but to play it safe I’m going to go with the t3.small instance type over the nano. I stay with the default settings for everything else.

Connect to GitHub
I need to clone a GitHub repo to this new environment. To make this easier, I’ll generate a ssh keypair to connect the two. To do this, use the linux utiltity ssh-keygen in the Cloud9 terminal. The process looks like as follows. (I am generating an rsa type key).
$ ssh-keygen -t rsa
Hit enter several times unit you see the following on your screen.
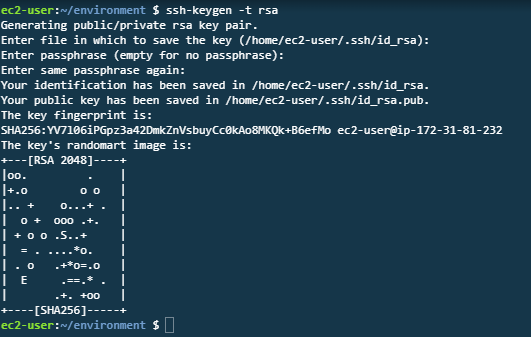
Note: You can enter a file location and password for your ssh key if you want, but for now I don’t feel I need either.
Then, to access the key I just entered then perform the following to access the generated key. The path that I am accessing is the path provided to me in the image above.
$ cat /home/ec2-user/.ssh/id_rsa.pub

The above command will then display the entire SSH key. I copy the entire key add it to my SSH keys in GitHub, under Settings > SSH and GPG keys.
With the SSH keypair added to both the Cloud9 Instance and GitHub, I can easily clone the project repo to my environment. This makes source control a lot easier.
Setup Python Essentials
Since I am working with Python, I like to setup a couple different things, some a requirements, some are just nice-to-haves. The following sections go through some basics.
Create and Activate Virtual Environment
If I’m going to be installin packages, I need a virtual environment. I know my Cloud9 environment is using Python3 (3.6.10 at the time of this work, to be exact), so I use the following command to create and then activate the virtual environment.
Note: The last argument in the code is what I am choosing to call my virtual environment folder. Any string will do. Common names are venv and .venv. I like to name my virtual environments the same as the project folder, with a leading period. But you can name it any string you want. Just make sure you add the virtual environment folder to your gitignore. No need to back those up to GitHub.
$ python3 -m venv .flask_app
Requirements and Makefile
In order to install the needed python packages I create a requirements.txt file. This file lists all of the packages I plan to use for this Flask app.
As a nice-to-have, I like to create a Makefile. The Makefile allows for simple commands to execute common and repeated actions, such as installs, testing, and running files. It will also become very useful when I setup Continuous Integration with CircleCI (to come, later).
To create a Makefile from the command line, enter the following command in the working directory of your project.
Note: Make sure the Makefile is TAB SPACED. If not the Makefile will not function correctly.
As an example of a Makefile, here is the one I created for this project.
setup:
	python3 -m venv ~/.flask_app

install:
	pip install --upgrade pip &&\
		pip install -r requirements.txt

test:
	#python -m pytest -vv --cov=myrepolib tests/*.py
	#python -m pytest --nbval wine_predict/wine_quality_predict.ipynb

lint:
	hadolint Dockerfile
	pylint --disable=R,C,W1202 main.py
	pylint --disable=R,C locustfile.py
	pylint --disable=R,C python_scripts/**.py
	pylint --disable=R,C,W0104,E0602 wine_predict/**.ipynb

run:
	python3 main.py

all:
	install lint test
Currently my testing steps are commented out. I never quite got them to work. But I leave them in as an example of how to easy run tests with a Makefile.
With this Makefile, for example, when I want to install the packages in requirements.txt , now all I need to do is enter make install on the command line, and python with upgrade pip, if needed, and then install the indicated packages.
Continuous Integration
I like to connect my GitHub Repo to CircleCI. CircleCI is a Continuous Integration and Development tool. Every time a change is detected in the GitHub repo, CircleCI will automatically rebuild the repo and perform any tasks you tell it to, such as testing. This way you can quickly tell if a change you made to your project accidentally broke something, or if the code is behaving askew. For this project I’m only going to set up CircleCI to lint select python scripts, but I think it’s a good habit to get into to set up Continuous Integration monitoring for any project I’m working.
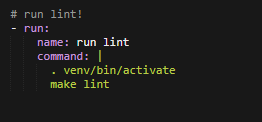
To get CircleCI to work, I need to add the file config.yml to a subfolder of my repo named .circleci. Default config.yml files are available at CircleCI, and are specific to each programming language. The screenshot below shows a custom section of my config.yml. This section tells CircleCI to lint select Python files. You may notice that I’m using the Makefile commands to execute this command.
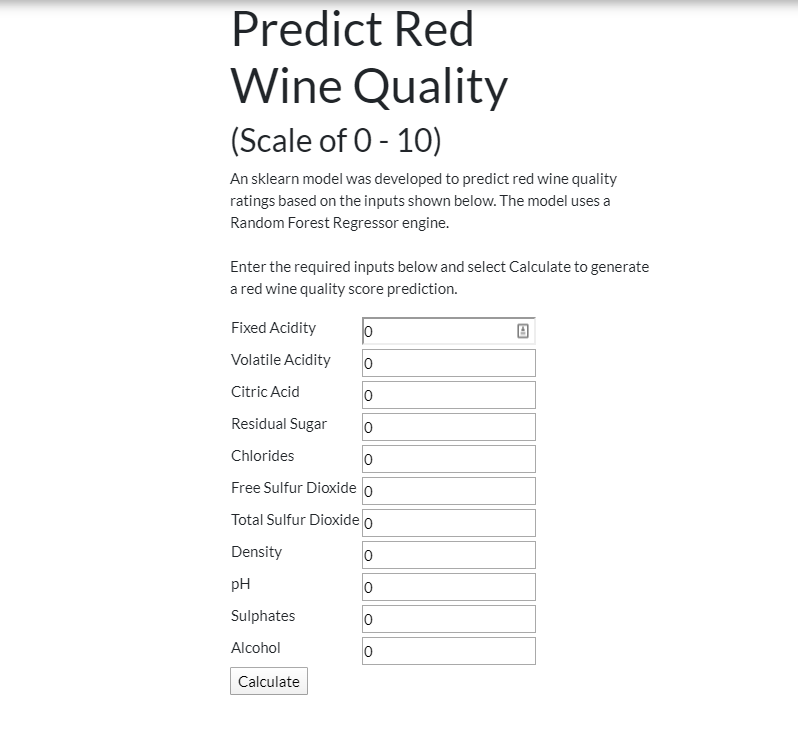
##Step 2b - Create the Flask App The flask app is pretty straightforward. It employs some html coding, which is not my strong suit. The app takes the feature variables as inputs and generates a predicted wine quality score. The app uses the pickled random forest regression and standard scalar objects.
See the main GitHub repo for the complete code.
Step 3 - Put Flask App in Docker Container
Finally, the whole point of this project. I will now put my Flask app into a Docker Container.
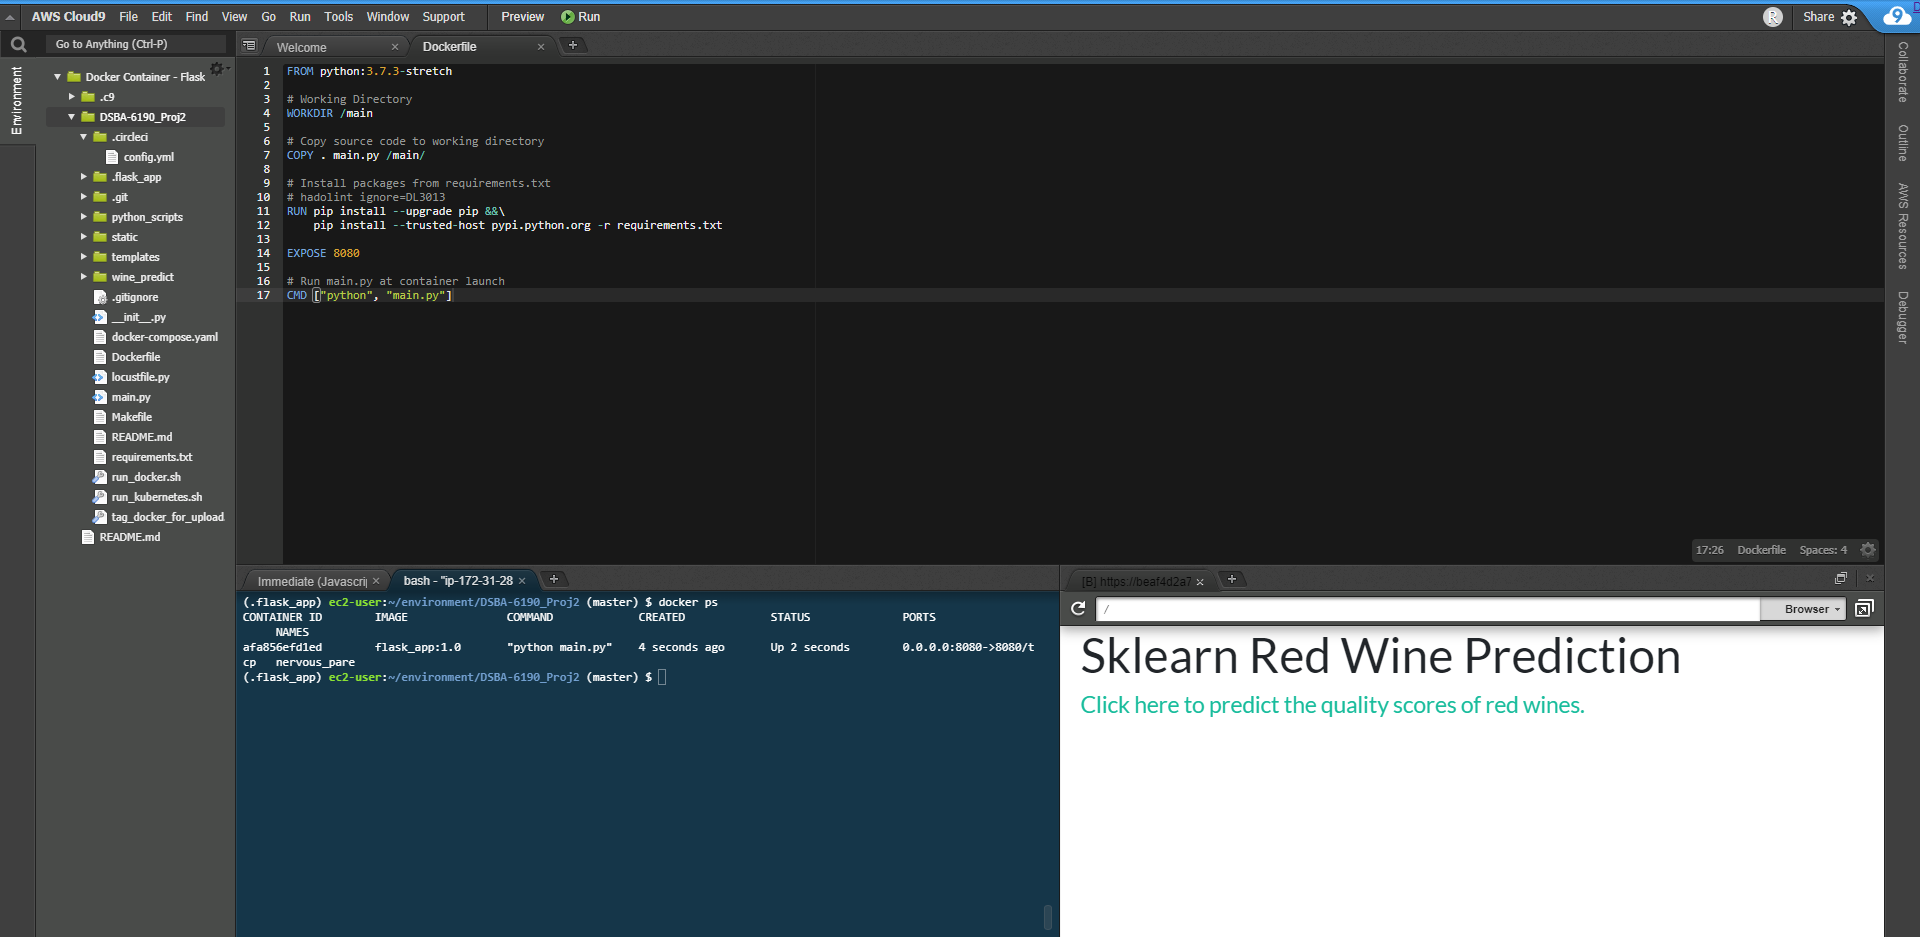
Another bonus for Cloud9 is that it already has docker installed. No extra setup required, I can just go right into working with docker.
Dockerfile
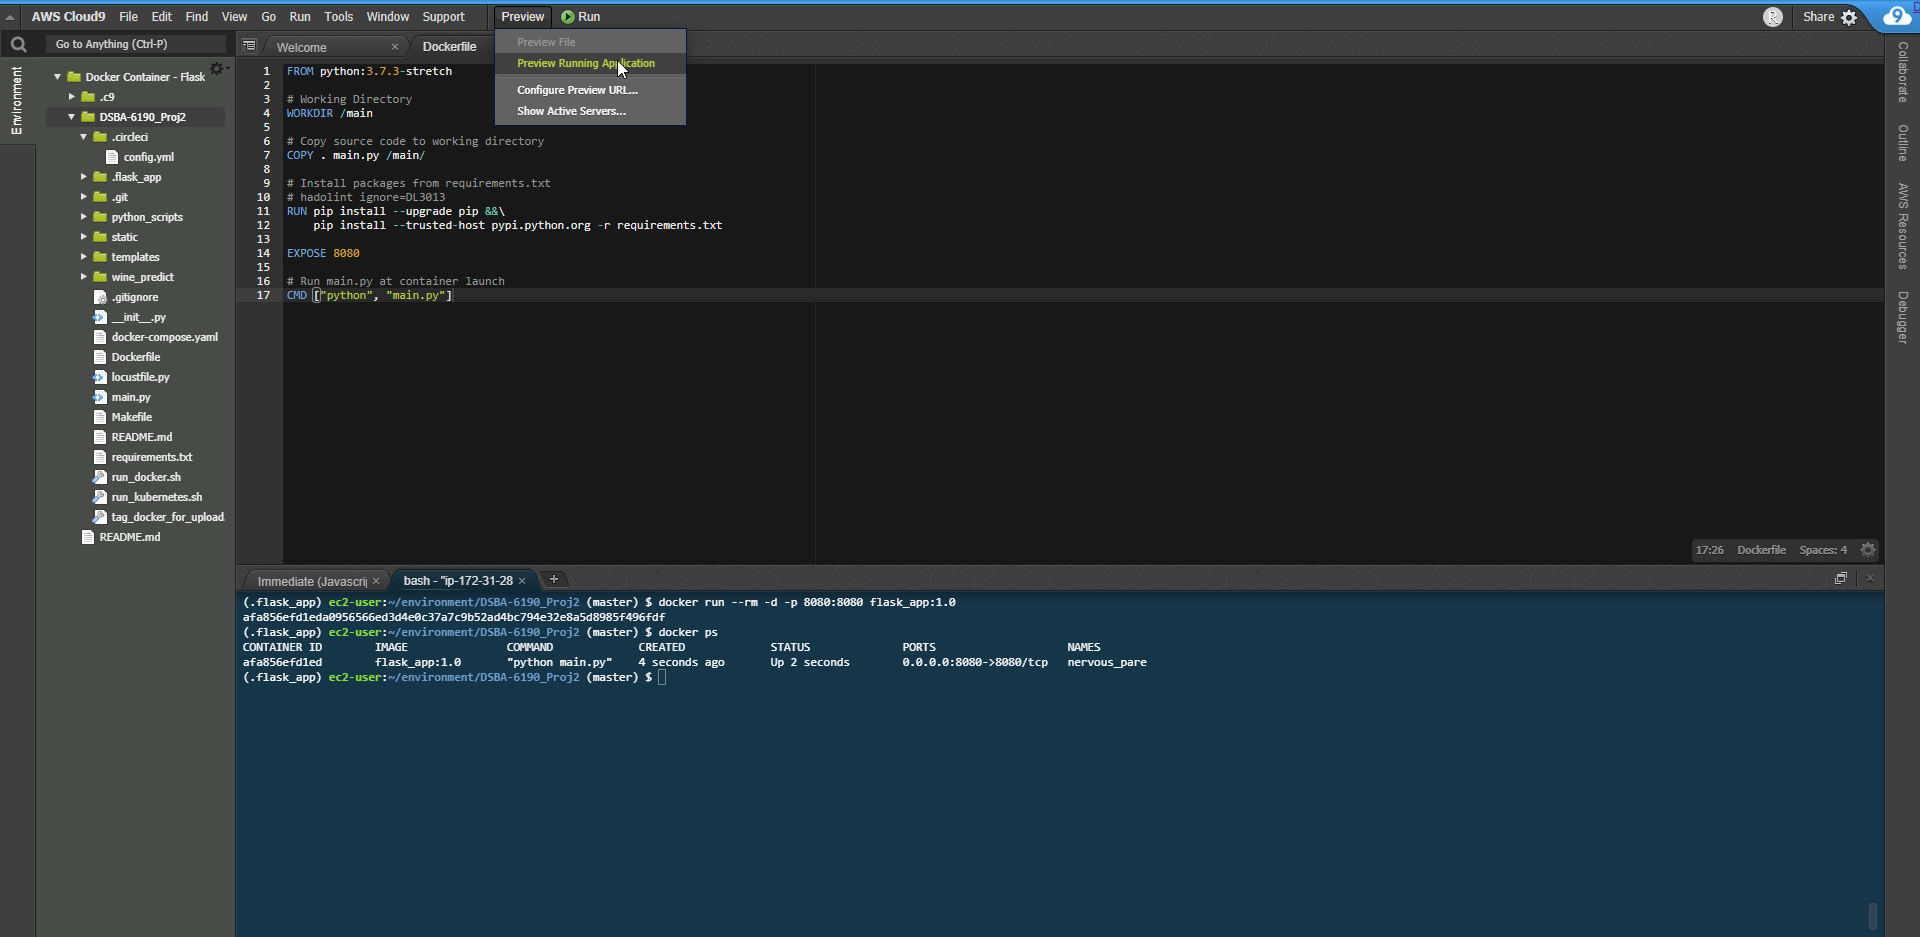
In order to create a docker container, I need to create a Dockerfile. A Dockerfile lists the instructions for how the docker container is going to be built. The following is the Dockerfile for this project.
FROM python:3.7.3-stretch

# Working Directory
WORKDIR /main

# Copy source code to working directory
COPY . main.py /main/

# Install packages from requirements.txt
# hadolint ignore=DL3013
RUN pip install --upgrade pip &&\
    pip install --trusted-host pypi.python.org -r requirements.txt

EXPOSE 8080

# Run main.py at container launch
CMD ["python", "main.py"]
Note: I am including in this Dockerfile an additional separate Docker image, python 3.7.3-strech. This Docker image has all of the Python functions I need, like pip. Think of it as a shortcut to creating an evironment that will run expected Python functions. This way, the needed functions do not need to be installed one by one.
Notice the command EXPOSE 8080. In this Dockerfile this doesn’t actually do anything. But it does tell me, the user, that the open port in my Docker Container is port 8080. I defined this open port in the file main.py. But by putting this command in the Dockerfile, neither I, nor whoever is working on this project in the future, has to dig for it.
Create Container
Now that the Dockerfile has been created, and placed in the working directory of the project, I can create a Docker container. All I need to do is run docker build on the command line, and supply a name and version, followed by a period. Do Not Forget The Period! It’s very easy to overlook. I believe this is telling the docker build command the Dockerfile is in the working directory. If, for some reason, the container was in a sub-directory, instead of a period I would add a relative path to that sub-directory (I think).
$ docker build flask_app:1.0 .
If everything went as planned, then within a couple minutes the Docker container will be built.
Note: Sometimes in Cloud9 there are old Docker Images on my machine. I don’t know why. But this can eat up space. If your docker build fails, check if your machine’s memory is being eaten up by other docker images. If so, remove them.
To see all built Docker containers, including the one I just created, use the following command: build up
$ docker images
``'

## Run Container
So, I've built a container. Great! But now what? How do I access my Flask app? To do that I need to **run** the container. This will activate the **CMD** command in my Dockerfile, which will execute following command:

```console
$ python main.py
This main.py file is the main file in my Flask app. So running the Docker Container will result in my Flask app running.
So, to actually run the Docker Container, all I need to do is enter the following:
$ docker run --rm -d -p 8080:8080 flask_app:1.0
I’m sure you noticed the different flags and arguments in the docker run command. A few notes on that:
- rm: Remove docker image after run is stopped. This is useful to prevent a build-up of stopped containers.
- d: Docker runs the container in the background. This gives me access to my current terminal.
- p: This argument maps the docker port to the local port, in this case 8080 to 8080. Remember, the exposed Docker port is 8080, per the Dockerfile.
Also, be aware of the -v tag with docker run. This is a powerful tag which enables a developer to map a directory in their local files to the a directory in the Docker container. This makes it possible to edit Docker container files locally.
I also followed it up with this command, which lists running Docker containers, to verify it is running.
$ docker ps
You can see in the docker ps call that the ports I assigned in the docker run call are being mapped as intended.
Verify Flask App is Running
With the Docker container running, I need to verify that the Flask app is running. Cloud9 now offers a very useful tool for this. Just click Preview followed by Preview From Running Application from the drop-down menu.
This will then open a new screen, showing the running app.
Note: I believe you need to use local port 8080 for this to work. Google’s equivalent service allows more flexibility on what the localhost port has to be, but I think with Cloud9 it has to be 8080.
With the Docker container built, running, and the application tested, I can shut down the running container. Just run docker stop
$ docker stop <container id>
Step 4 - Push Docker Container to DockerHub
With a successfully built and run Docker container, I will now push the container to DockerHub. To do this, I need a DockerHub profile, and I need to know my profile name. In my case it is canfielder.
I also need to create a repository where plant to store my Docker Container. In this case I have chosen flask_app.
With DockerHub set up, I can go back to my Cloud9 environment. I need to log into Docker in Cloud9 on the command line. DockerHub does not currently have the SSH key option that GitHub has. I just enter the following command followed by my username and password set up.
$ docker login
Before I can make the push my Docker container to DockerHub, I need to rename/tag the container so that it has a naming convention DockerHub will understand. To push to DockerHub, the naming convention needs to be:
$ <dockerhub profile name>/<docker container name>:<version>
In my case, this means:
canfielder/flask_app:1.0
To rename my docker container, I will use the command docker tag. Below you can see my available images after running docker tag. You can see the original container/image is there, as well as a copy with the new tag.
Note: I used the tag latest instead of 1.0. This is the default version if no version is supplied. Any version tag is fine, just be specific.

With the Docker container in the right format, the login successfully entered, and a repository at DockerHub set up, pushing to DockerHub is easy. I just enter:
$ docker push canfielder/flask_app:latest
Step 5
To test that the push to DockerHub was successful, I’m going to go to a different cloud service and try to pull the Docker container, and then run it. I’ll used Google Cloud Platform (GCP)for this test.
Once at the GCP dashboard, I create a new project. Once the project up and running, I can go straight to the Cloud Shell.
Much like AWS Cloud9, GCP already has Docker enabled, so no extra setup. Just follow the same docker login instructions from before, and enter the needed login information.
Once logged in, I just enter the following:
$ docker pull canfielder/flask_app:latest
DockerHub also provides a direct copy button for this information at the DockerHub repo.
Once pulled, the same commands to run the Docker container used in Cloud9 apply here. After running the pulled Docker image we check to see it running.

GCP also has a web preview button, so once the Flask App is running, I can quickly see it. With GCP, the web preview opens on a new window.
Success!
Conclusion
Through this walkthrough I have:
- Developed a simple Flask app with a scikit learn model embedded.
- Created a Docker container in AWS for the Flask app.
- Pushed the container to DockerHub.
- Pulled the same container to GCP, where it successfully ran.